Friday, April 30, 2010

braid and pony

First start by putting her hair into a pony tail leaving out some hair all the way around her head.


Then starting at the bottom of the head proceed to do a french braid all the way around the pony tail.


When finished combine the braid into her pony tail.


Afterwords it will look like this. I added a cute flashy hair accessory. You can make the hair into a bun even if you prefer. Or even add other accessories.

Tuesday, April 27, 2010

Hair ideas

Any one may also feel free to send me other great hair ideas that I can add the site.
First start by making a pony tail without about 1-2 inches of hair all around the head.


Now make sections of pony tail all around the head. Split each section in half and twist with half from another section and do this all around the head. Adding the hair to the pony tail as you go.


we did this quick this morning so it didn't turn out as nice as normal because we were short on time. But in the end it should look similar to this.


Then you can make a bun or leave it into a pony tail. In our case my Daughter wanted a bung in her hair with it so that's what we did.

Bun Hawk

Start by wetting down and brushing the hair. Than by parting a large rectangle section to hair in the middle of her head, and secure it with a rubber band.


Twist the hair around the rubber band to make a bun. Then wrap another rubber band around the whole thing to secure it in place.


Now take another section of hair just above the ears all the way around the head and secure with a rubber band.


And again make a bun and secure it with a rubber band


Then just repeat until you have 4 buns all together.


In the end it should look something like this.

Saturday, April 24, 2010

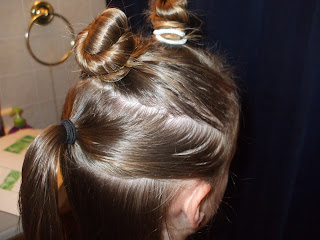
1st I started by making my DD's hair into eight sections. 4 on each side as shown in the picture.


Then I took half of each and twisted them together and added them to another section of hair. You can make the sections where ever you want.


I did that with all the sections.


After that I put half of her hair into a pony tail as shown.


I then separated the remaining hair into two sections and twisted the first section.


Then I tucked it into her hair tie and added it to the pony tail.


I repeated it with the other section of hair on the bottom.


I then added a cute hair accessory to her hair. This hair do takes a little while to do. But I think it turned out nice. I did this while she was watching t.v. and I just came up with it as I went so I'm sorry if the walk through is hard to understand. I can answer any questions that anyone might have.

Tuesday, April 20, 2010

We didn't have much time before school yesterday morning because we were running behind so I just took a small section of hair to keep it out of her eyes.
This is the hair style I did for my daughter Saturday. I didn't do a picture walk through. But as you can see I separated her hair into two sections like I would for pigtails but instead of a straight line I did zig zags all the way down. Then Took several sections and made pony tails and just connected them together as I went down the hair.

Friday, April 16, 2010

So today we did this hair style. We were running a little behind today so I did not make a picture tutorial of my own but you can find one on this hair style on this site http://cutiepiehaircreations.blogspot.com/

Wednesday, April 14, 2010

I got his hair style from another web site. I thought it would be very cute for my daughter. First I separated the front half of her hair just behind the ears and from one ear to the other as you can see in the picture and I also clipped the remaining hair to keep it out of the way.
It's kinda hard to tell but I then separated one side into 3 sections and clipped them back out of the way. The front section I made into 4 small pony tails as shown.
Then I took one pony tail at a time and twisted it and combined it into the second row of pony tails that I made with the 2nd section of hair.
I then did the same with the 3rd section of hair. Then repeated it on the other side of her head.

This was the finished product. As you can see I put the remainder of her hair into a pony tail with ribbon. It took a while but I think the end results were worth it. She had a fun day showing off her hair to everyone. It also held up during basketball practice and looked good in the pictures that we took after basketball with her team.

Tuesday, April 13, 2010

Up Do


For Holloween my daughter was a High School Musical Cheerleeder. So of course she had to have a cute cheerleader hair style to go with it. Here is what I ended up with. Again This is just a picture I had in my collection, so I don't have instructions or more pictures. Very sorry.

For spirit week in October 09 my daughter had crazy hair day at school and this is what we came up with and ended up doing. I'm not sure where I found the idea because it's been a while but I thought it was real cute. I wish I had pictures from all around her had so you could see exactly what it looked like. I separated her hair into 4 sections on the top and made for braids off to the side. Then I grabbed the next section of hair and just made a normal braid and clipped it up. For last part as I braided her hair I left a small strand of hair out of each section before I crossed it into the braid.

Hair

So I am very new to running a blog site but have been doing a lot of research on new hair ideas to do on my daughter, plus a few of my own. Hopefully I can post daily pictures and tutorials to help anyone else out that needs new ideas also. Plus anyone can feel free to show me some of your ideas and I can post them as well.